We have installed IBM Domino 9.0.1 Social Edition in previous post. Now we are going to install IBM notes client 9.0.1 with Domino Administrator & Designer Social Edition and Active Directory Integration.
Domain Administrator has to be installed on an system which you use to manage Active directory to achieve the Active directory integration with domino. We are going to install it on Windows 7 32Bit Workstation in our domain. Remote Administration tool need to be installed on that windows 7 Machine. You can download remote server administration tools from following Link.
https://www.microsoft.com/en-pk/download/details.aspx?id=7887
After installing Remote server tools, Open Control Panel -- Programs and features -- Turn windows features on or off -- Remote server administration tool -- Role Administration tools -- Select AD DS and AD LDS tools and select all option under. After This you will see Active Directory Users and Computers under Administrative tools in start menu.

Notes Client Package 9.0.1 is Client only. I have downloaded the Domino Designer package which includes Notes Client, Domino Administrator & Designer.
DOMINO_DESIGNER_901_WIN32_EN.exe
Before Running the Client Setup we have to Turn on the Domino Web Server and Ldap Server.
Double click the IBM Domino Console Icon on Domino server Desktop and Run the Command "load http" and "load ldap" send in the Domino Console one by one.

Restart the Domino Server. Now you can Browse Domino Server from any client machine browser.

Now Start the Installer and click next

This will extract the installer files and start the setup. Click next

Accept the license terms and click next

As we are not using client only package. We don't have multi-user option available. You can change the install and data files directory. Click next.

Chose features you want to install. We have selected all features and click Next.

Click Install

Installation Started

Setup completed. Click Finish

Now you can see following three icons on the desktop

Now We have to install ADSync tool for Active directory integration.
Before Active Directory Integration download IBM Notes 9.0.1 Fix Pack 3
notes901FP3_basic_win.exe
Intall this Notes 9.0.1 FP3 on Windows 7 32bit
After FP3 Installed Open a DOS command prompt
window, and navigate to the directory where you installed the client. Enter the
following command and press Enter.
regsvr32 nadsync.dll
If you face Access Denied Error

Do the following.
1) Using regedt32, go to HKLM\Software\Microsoft\MMC\SnapIns\{E355E538-1C2E-11D0-8C37-00C04FD8FE93}
2) Right click the key, and go to "permissions." Confirm that the Administrators group has "Full Control" checked.
3) Expand the key, and right click on NodeTypes. Attempt to give SYSTEM and Administrators "Full Control" if not already enabled.
4) If that fails, click the "advanced" button and go to the owner tab. Change the owner to Administrators, and click the checkbox "replace owner on subcontainers and objects" then click OK.
5) Give SYSTEM and Administrators "full control" for the NodeTypes, all subfolders under NodeTypes, and StandAlone.
Re-run "regsvr32 C:\Lotus\Notes\nadsync.dll" and this time the nadsync.dll registers successfully.
Open Active Directory Users and Computers from windows 7 32bit and u will see following

You can Do Install Adsync Tool on widnows 7 64bit or on the Domain Controller too. because of 64bit we need to make changes in following regedit.
HKEY_LOCAL_MACHINE\SOFTWARE\Wow6432Node\Microsoft\MMC\SnapIns\{E355E538-1C2E-11D0-8C37-00C04FD8FE93}
Do the same as we have done for windows 7 32bit in above key. And open a command prompt "Run As Administrator" and open c:\windows\SysWOW64\dsa.msc
I have done same on My Windows Server 2012 R2 64bit Domain Controller and got following

If Synchronization is not enabled right click "Domino Directory Synchronization" and click Options.
This will ask you for Administrator Password. Type the password. Specify the Domino Server and you will get following

On Notes Settings TAB set the following

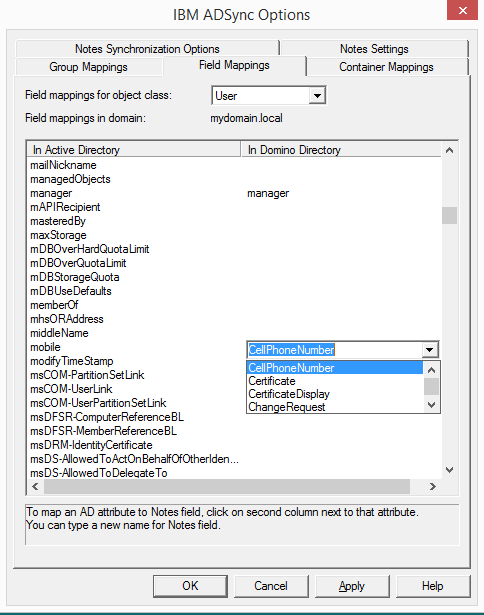
Field Mappings. Use this tab to map Active Directory fields to Domino Directory fields. Select a row (Active Directory field), and choose the Domino field to map to it.

Container Mappings. Use this tab to map Active Directory containers to specific Domino certifiers and/or policies. By default, the certifier and policy selected during setup are used for all operations

Click Apply and OK.
Now When you create a new user in domain you will have following Option too while creating a User.

You can register Old users in Domino too. Just right click the User and click Register in Domino.

Click Register now.

Select Certifier and Registration Policy and click Ok


Now Right Click the user and Click Synchronize with Domino. This will ask the common password for the user. Type in the password.

You can do same to Register and Synchronize and Group with Domino.
Now Open Domino Administrator. And you will see Active Directory Users in People Tab and Groups in Groups Tab


Now we can manage Users for Active Directory and Domino from one place. Next we will configure email clients for domino in our Lab.
Cheers :)
Domain Administrator has to be installed on an system which you use to manage Active directory to achieve the Active directory integration with domino. We are going to install it on Windows 7 32Bit Workstation in our domain. Remote Administration tool need to be installed on that windows 7 Machine. You can download remote server administration tools from following Link.
https://www.microsoft.com/en-pk/download/details.aspx?id=7887
After installing Remote server tools, Open Control Panel -- Programs and features -- Turn windows features on or off -- Remote server administration tool -- Role Administration tools -- Select AD DS and AD LDS tools and select all option under. After This you will see Active Directory Users and Computers under Administrative tools in start menu.

Notes Client Package 9.0.1 is Client only. I have downloaded the Domino Designer package which includes Notes Client, Domino Administrator & Designer.
DOMINO_DESIGNER_901_WIN32_EN.exe
Before Running the Client Setup we have to Turn on the Domino Web Server and Ldap Server.
Double click the IBM Domino Console Icon on Domino server Desktop and Run the Command "load http" and "load ldap" send in the Domino Console one by one.

Restart the Domino Server. Now you can Browse Domino Server from any client machine browser.

Now Start the Installer and click next

This will extract the installer files and start the setup. Click next

Accept the license terms and click next

As we are not using client only package. We don't have multi-user option available. You can change the install and data files directory. Click next.

Chose features you want to install. We have selected all features and click Next.

Click Install

Installation Started

Setup completed. Click Finish

Now you can see following three icons on the desktop
Now We have to install ADSync tool for Active directory integration.
Before Active Directory Integration download IBM Notes 9.0.1 Fix Pack 3
notes901FP3_basic_win.exe
Intall this Notes 9.0.1 FP3 on Windows 7 32bit
After FP3 Installed Open a DOS command prompt
window, and navigate to the directory where you installed the client. Enter the
following command and press Enter.
regsvr32 nadsync.dll
If you face Access Denied Error

Do the following.
These steps require modifying the registry of a Windows 7 workstation. Please use caution and make backups of the registry, as incorrect modifications to the registry can render the workstation OS unusable.
1) Using regedt32, go to HKLM\Software\Microsoft\MMC\SnapIns\{E355E538-1C2E-11D0-8C37-00C04FD8FE93}
2) Right click the key, and go to "permissions." Confirm that the Administrators group has "Full Control" checked.
3) Expand the key, and right click on NodeTypes. Attempt to give SYSTEM and Administrators "Full Control" if not already enabled.
4) If that fails, click the "advanced" button and go to the owner tab. Change the owner to Administrators, and click the checkbox "replace owner on subcontainers and objects" then click OK.
5) Give SYSTEM and Administrators "full control" for the NodeTypes, all subfolders under NodeTypes, and StandAlone.
Re-run "regsvr32 C:\Lotus\Notes\nadsync.dll" and this time the nadsync.dll registers successfully.
Open Active Directory Users and Computers from windows 7 32bit and u will see following

You can Do Install Adsync Tool on widnows 7 64bit or on the Domain Controller too. because of 64bit we need to make changes in following regedit.
HKEY_LOCAL_MACHINE\SOFTWARE\Wow6432Node\Microsoft\MMC\SnapIns\{E355E538-1C2E-11D0-8C37-00C04FD8FE93}
Do the same as we have done for windows 7 32bit in above key. And open a command prompt "Run As Administrator" and open c:\windows\SysWOW64\dsa.msc
I have done same on My Windows Server 2012 R2 64bit Domain Controller and got following

If Synchronization is not enabled right click "Domino Directory Synchronization" and click Options.
This will ask you for Administrator Password. Type the password. Specify the Domino Server and you will get following

On Notes Settings TAB set the following

Field Mappings. Use this tab to map Active Directory fields to Domino Directory fields. Select a row (Active Directory field), and choose the Domino field to map to it.
Container Mappings. Use this tab to map Active Directory containers to specific Domino certifiers and/or policies. By default, the certifier and policy selected during setup are used for all operations

Click Apply and OK.
Now When you create a new user in domain you will have following Option too while creating a User.

You can register Old users in Domino too. Just right click the User and click Register in Domino.

Click Register now.

Select Certifier and Registration Policy and click Ok


Now Right Click the user and Click Synchronize with Domino. This will ask the common password for the user. Type in the password.

You can do same to Register and Synchronize and Group with Domino.
Now Open Domino Administrator. And you will see Active Directory Users in People Tab and Groups in Groups Tab


Now we can manage Users for Active Directory and Domino from one place. Next we will configure email clients for domino in our Lab.
Cheers :)


