Chitika

Friday, November 26, 2010

Embed or link to a video from your MS Power Point 2010 presentation

With Microsoft PowerPoint 2010, you can now embed a video from a file directly into your presentation. And, as you have with earlier versions of PowerPoint, you can also embed an animated .gif file from the Clip Art library.
Notes:

  • PowerPoint will support QuickTime (.mov, .mp4) and Adobe Flash (.swf) files when you have installed the QuickTime and Adobe Flash players.
  • There are some limitations when using Flash in PowerPoint 2010, including the inability to use special effects (such as shadows, reflections, glow effects, soft edges, bevels, and 3-D rotation), the fade and trim capabilities, and the ability to compress these files for easier sharing and distribution.
  • PowerPoint 2010 does not support 64-bit versions of QuickTime or Flash.
Embed a video from a file:
  1.  In Normal view, click the slide in which you want to embed a video.
  2. On the Insert tab, in the Media group, click the arrow under Video, and then click Video from file.
  3. In the Insert Video dialog box, locate and click the video that you want to embed, and then click Insert.
TIP: You can also click the Video icon in a content layout to insert a video.


Embed an animated GIF from the Clip Art library:
  1. In Normal view, click the slide in which you want to embed an animated GIF file.
  2. On the Insert tab, in the Media group, click the arrow under Video, and then click Clip Art Video.
  3. In the Clip Art task pane, in the Search for box, enter the key word that describes the selection of animated GIFs that you want to preview.
  4. In the Search in box, select the check boxes that apply to the scope of your search.
  5. In the Results should be box, ensure that only the Movies check box is selected.
  6. Click Go.
 TIP: You may have to reword your request for a video clip until you get the results you like.

Link to a video file from your presentation:

You can link to an external video or movie file from your Microsoft PowerPoint 2010 presentation. By linking your video, you can reduce the file size of your presentation.
Please make sure that you have the owner's approval before you link to, use, or distribute content that is copyrighted.
To add a link to a video from your PowerPoint presentation, do the following:
  1. On the Slides tab in Normal view, click the slide to which you want to add a video or animated GIF file.
  2.  On the Insert tab, in the Media group, click the arrow under Video.
  3. Click Video from File, locate and click the file that you want to link to.
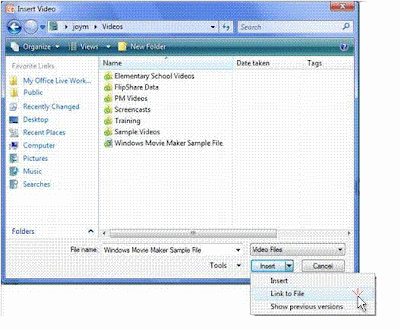
  4. On the Insert button, click the down arrow, and then click Link to file.
To prevent possible problems with broken links, it is a good idea to copy the videos into the same folder as your presentation, and link to them there.


Link to a video file on a web site:

You can link to a video file on your local drive or to a video file that you uploaded to a web site, such as YouTube.
Please make sure that you obtain the owner's approval before you link to, use, or distribute content (that you did not create) that is copyrighted


  1. On the Slides tab in Normal view, click the slide to which you want to add a video.
  2.  In your browser, go to the web site that contains the video that you want to link to, such as YouTube.
  3. On the web site, locate the video, and then locate and copy the Embed code.
  4. Back in PowerPoint, on the Insert tab, in the Media group, click the arrow under Video.
  5. Click Video From Web Site.
  6. In the Video From Web Site dialog box, paste the embed code, and then click Insert.
     
Note:
Most web sites that contain videos include an embed code, yet the locations of embed codes will differ depending on each web site. And, some videos do not have an embed code, and therefore you cannot link to those. And, to be clear, even though they are called 'embed codes', you are actually linking to the video and not embedding it in your presentation.
In YouTube, the Embed code is located to the right of the video.

Good Luck,

Tuesday, November 23, 2010

Co-author a presentation with your colleagues PowerPoint 2010

In Microsoft PowerPoint 2010, multiple authors can simultaneously change the same presentation stored on a server.

Co-authoring enables you and other collaborators to change a presentation at the same time, instead of having to do so separately. It also prevents anyone from being "locked out" of a file that is being used by or that is checked out to someone else. You and your co-authors no longer have to take turns editing a presentation and then merge different versions of the presentation together.

You can use SharePoint Foundation 2010, Microsoft SharePoint Server 2010, or Microsoft Office Live Workspace to host and store your presentation. The server keeps a central copy of the presentation and records edits from multiple authors. You and your co-authors can see who is editing the presentation and where in the document they are working, and their changes get merged into your presentation.

Earlier versions of PowerPoint do not support co-authoring. To take advantage of this new feature, all co-authors must have PowerPoint 2010 installed on their computers.

Co-author a presentation:
  1. In PowerPoint 2010, open the presentation that is stored on the server. When one or more other authors does the same, a notification appears in the status bar at the bottom of PowerPoint, together with the total number of co-authors currently working on the presentation. To see the names of the co-authors, click the number in the status bar.
  2. On the View tab, in the Presentation Views group, click Normal to view your presentation in Normal view.
  3. In the left pane that contains the Outline and Slides tabs, on the Slides tab, a small icon appears on the lower-right corner of the slide thumbnail that indicates that a co-author is making changes to that slide. Click the icon to see the name of the co-author.
Note:
  • Another way to see the names of the co-authors of the presentation is to click the File tab, and then click Info on the left side of the screen. The names of the co-authors appear in the middle pane.
  • To send an e-mail message or instant message to your co-authors, click Send a Message, and then click Send an E-mail Message or Send an Instant Message.
  • When another author saves their changes, PowerPoint notifies you, the original author of the presentation, that changes have been made. On the pane that contains the Outline and Slides tabs, on the Slides tab, an icon appears in the lower-right corner of the slide thumbnail that was changed. 
Review changes made by other authors:
  1. To see whether other authors have changed your presentation, click the File tab and then click Info. Then, next to Document Updates Available, click Save, and then click Save and Review.
  2. Then, to see the changes that other authors made, click Review Changes.
  3. When you click Review Changes, PowerPoint opens a new tab, which is named the Merge tab, on the ribbon and a Revisions pane on the right side of the PowerPoint window. The Revisions pane contains a Slides tab that lists the slides that other authors changed, and a Details tab that lists the changes to the currently displayed slide.
    On the Merge tab, you can use the buttons in the Resolutions group to show next and previous changes made by other authors, and accept or reject those changes. To exit Merge view, click Close Merge View.
Note:
While in Merge view, you cannot merge in new updates from other authors or upload changes to the server. You must complete your review by clicking Close Merge View, which then automatically uploads your changes to the server.

Configure PowerPoint to notify you each time authors make changes:
  1. Click the File tab.
  2. Click Options on the left side of the screen, and then in the PowerPoint Options dialog box, click Save.
  3. Under File merge options for shared document collaboration server files, select the Show detailed merge changes when a merge occurs check box.

Good Luck.

Windows Small Business Server 2011 beta is available

In 2011 we will see the release of a new version of Windows Server.
Windows Small Business Server 2011 (codenamed Aurora) is currently available in two offerings - Standard and Essentials — that introduce new features without entirely forcing the cloud message into the small data center. The publically available materials are rather light on feature information at this point, however, some of the new features listed in the Small Business Server 2011 Standard datasheet include:
  • Data protection offerings: Data and client protection built in for data and files for client and server automatically.
  • Built-in management: Simplifying PC management through an integrated, comprehensive tool.
  • Collaboration: Office Web Apps  and SharePoint integration to simplify remote access.
The Windows Small Business Server 2011 Essentials datasheet does bring the cloud message closer. A clear objective of this platform is integrating between on-premise and online services, as well as some of the similar features of the Standard edition.
Will you download the beta?

Good Luck

How to join Ubuntu to a Windows Workgroup

For the purpose of simplicity, I am going to demonstrate this task on a Ubuntu 10.04 machine. The process will be similar on just about any distribution (with the biggest difference being the installation of Samba). So, with that said, let’s get to it.

Installing Samba

This, of course, is the first step in this process. To install Samba open up a terminal window and issue the command:
sudo apt-get install samba smbfs
You will need to enter your sudo password for this to work. There might also be dependencies to install, which will be dictated by what you currently have installed on your system. Once complete, you will have the Samba system installed and ready to be configured.

Configuring Samba

Now it’s time to open up the /etc/samba/smb.conf file and look for the line:
workgroup = WORKGROUP
You can always open that file with gedit if you like. I prefer using nano as my text editor (no need to start a text editor flame war here). What you need to do is to change WORKGROUP to match the actual name of the Workgroup you need to join. After you have that complete, save the file, and restart Samba with the command:
sudo /etc/init.d/smbd restart
You can also restart Samba with the command:
sudo service samba restart
Your Ubuntu machine should now show up for anyone else who happens to be in the same Workgroup. You can also begin sharing out folders to other users. This is very simple to do from within the Nautilus file manager. Just right-click a folder and click the Sharing Options entry. This will allow you to easily set up file sharing as well as specific permissions for that folder.

Good Luck.

How do I install Windows Virtualization Role on Windows 2008?

Steps to Install Hyper-V Role on Windows server 2008.
  1. First you need to Click on Start -> All Programs- > Administrative Tools -> Server Manager
  2. After you have Server Manager open you need to click on Roles on the left pane
  3. Then you need to click on the Add Roles at the top right of the screen
  4. After you have clicked on the Add Roles button then the Add Roles Wizard should come up
  5. Click on the Next button
  6. Select Windows Server Virtualization
  7. Click on Next
  8. Click on Next
  9. Select the Network card that you want to use for the Virtual machines and then click Next
  10. Click on Install
  11. Click on Close and then Reboot the server
Here you Go :) good luck.

What do I need to know before installing Windows 2008 Hyper-V?

If you are looking into installing Windows 2008 Hyper-V you will need to check your hardware first as you will need is a x64 based processor. It will also require you to have Hardware Data Execution Protection enabled.
Another thing that you will need to do before installing the virtualization role on Windows 2008 is to install two updates. Both of these updates are located in the <systemdrive>\windows\wsv folder. Inside this folder you should find two updates. One of the updates is Windows6.0-KB939854-x64.msu and the other update is Windows6.0-KB939853-x64.msu. You can install these updates in any order that you like. If you do not install these updates windows server virtualization will not be an option when you try to add the virtualization role.

Good luck with Hyper-V installation

What are the key features of Windows 2008 Hyper-V?

Following are some key features of windows 2008 Hyper-V
  1. Support for Virtual LANs.
  2. Large amount of memory for the virtual machines,
  3. Ability to run 32bit and 64bit machines at the same time,
  4. Up to 32GB of RAM and 4 CPUs in each guest OS,
  5. Support for either one processor or multiple processor support for the virtual machines,
  6. Support for Snapshots, used to capture the state of a virtual machine at a certain times. You can revert back to that snapshot at any time.
  7. Support for quick migration - allowing you move a virtual machine from one server to another without having shut down that virtual machine (not to be confused with live migration where there is no host downtime, comparable to VMware’s VMotion),
  8. Support for network load balancing between the virtual machines,
  9. Future integration with Microsoft Virtual Machine Manager (VMM) as its centralized management platform.
Good Luck.