We have installed Oracle Linux 7 in previous post. Now we are going to install Oracle database 11gR2 on Oracle Linux 7 for practice purpose.
First we need to install prerequisites for Oracle database 11gR2 on Oracle Linux 7.
Start your Oracle Linux 7 VM and login with the user oracle we have created during installation.

Open Terminal

Run Command. su root
Enter Root Password.
You will be in Shell for root user.

Now we have to update the Oracle Linux repo.
cd /etc/yum.repos.d/
wget http://public-yum.oracle.com/public-yum-ol7.repo

Now run following command.
yum install oracle-rdbms-server-11gR2-preinstall


Set selinux to permissive as root user.
vi /etc/selinux/config and change enforcing to permissive.

Stop the firewall service by running following command
[root@ol7 oracle]# systemctl disable firewalld
Now we have to create Directories where we have to install Oracle Database 11gR2
Run following commands as root.
mkdir -p /u01/app/oracle/product/11.2.0/db_1
chown -R oracle:oinstall /u01
chmod -R 775 /u01
Note that oracle is the user under which we are going to install database 11gR2. you can change your directory as per your user like "mkdir -p /u01/app/your-user/product/11.2.0/db_1"

Now edit bash profile for oracle user as oracle user.
[oracle@ol7 ~]$ vi .bash_profile
Insert following lines. Note that ol7.mydomain.local is hostname. change it as your hostname is.
ORACLE_HOSTNAME=ol7.mydomain.local; export ORACLE_HOSTNAME
ORACLE_UNQNAME=orcl; export ORACLE_UNQNAME
ORACLE_BASE=/u01/app/oracle; export ORACLE_BASE
ORACLE_HOME=$ORACLE_BASE/product/11.2.0/db_1; export ORACLE_HOME
ORACLE_SID=orcl; export ORACLE_SID
PATH=$ORACLE_HOME/bin:$PATH; export PATH
LD_LIBRARY=$ORACLE_HOME/lib:/lib:/usr/lib; export LD_LIBRARY
CLASSPATH=$ORACLE_HOME/jlib:$ORACLE_HOME/rdbms/jlib; export CLASSPATH

Now we are ready to install oracle database 11gR2 on Oracle Linux 7.1
Download Oracle database 11gR2 for Linux x86-64 from Oracle, You need oracle account to download the database software.
If you have support account then you can download 11.2.0.4. I recommend to install 11gR2 11.2.0.4 on Oracle Linux 7.1.
After Download extract 11gR2 files and you will have a folder named "database"

Open terminal and browse database folder. and run following command to start the installer.
[oracle@ol7 database]$ ./runInstaller


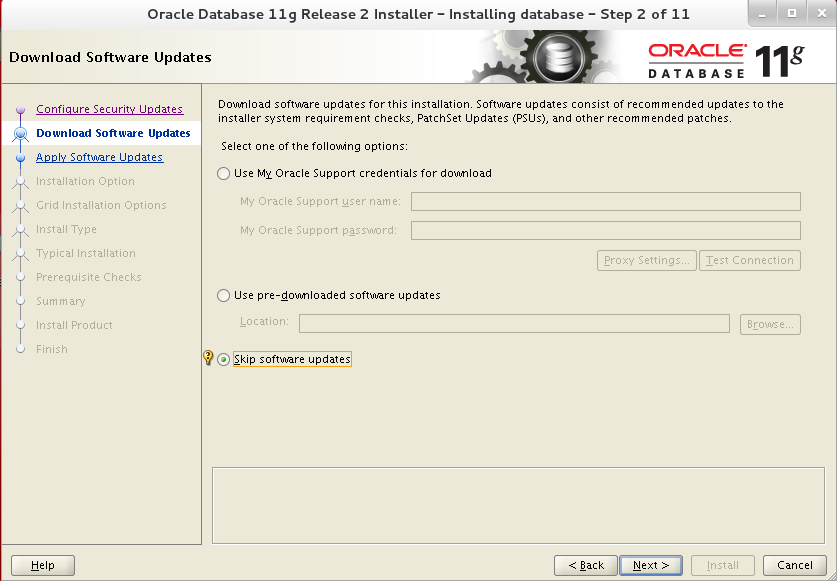
Skip Software updates and Click Next

Select Create and configure a database and Click Next

Select Desktop Class and Click Next

Set Global database name : orcl.mydomain.local
Set Administrative Password: password
Set a strong password as per oracle recommendation. I am going to use "oracle" as we are installing in test environment.

Click Next

Oracle will check minimum requirements for database 11gR2 on target system. I have face 2 warnings. You may fix these warning by installing the missing packages or ignore all as this is just a test environment. I am going to ignore these 2 missing packages as they will not effect installation. Click Ignore all and click Next

Click Install

Setup started.

You may face error like following.
In /u01/app/oracle/product/11.2.0/db_1/sysman/lib/ins_emagent.mk
Look for the line $(MK_EMAGENT_NMECTL)
Change it to $(MK_EMAGENT_NMECTL) -lnnz11
Click Retry and setup will continue. After database creation you will see following. Click ok

Run following scripts as root


Click OK after running scripts and you will see

Click Close, We have successfully installed Oracle Database 11gR2 11.2.0.4 on Oracle Linux 7.1
To Use Default HR schema we have to connect to sqlplus. Open terminal as Oracle user and run following command to connect to database. First we have to connect as SYSDBA to activate HR User.
[oracle@ol7 ~]$ sqlplus
Enter user-name: sys as sysdba


First we need to install prerequisites for Oracle database 11gR2 on Oracle Linux 7.
Start your Oracle Linux 7 VM and login with the user oracle we have created during installation.

Open Terminal

Run Command. su root
Enter Root Password.
You will be in Shell for root user.

Now we have to update the Oracle Linux repo.
cd /etc/yum.repos.d/
wget http://public-yum.oracle.com/public-yum-ol7.repo

Now run following command.
yum install oracle-rdbms-server-11gR2-preinstall

Press y and hit enter to install. This will take some time to complete.

You will see following after completion

vi /etc/selinux/config and change enforcing to permissive.

Stop the firewall service by running following command
[root@ol7 oracle]# systemctl disable firewalld
Now we have to create Directories where we have to install Oracle Database 11gR2
Run following commands as root.
mkdir -p /u01/app/oracle/product/11.2.0/db_1
chown -R oracle:oinstall /u01
chmod -R 775 /u01
Note that oracle is the user under which we are going to install database 11gR2. you can change your directory as per your user like "mkdir -p /u01/app/your-user/product/11.2.0/db_1"

Now edit bash profile for oracle user as oracle user.
[oracle@ol7 ~]$ vi .bash_profile
Insert following lines. Note that ol7.mydomain.local is hostname. change it as your hostname is.
ORACLE_HOSTNAME=ol7.mydomain.local; export ORACLE_HOSTNAME
ORACLE_UNQNAME=orcl; export ORACLE_UNQNAME
ORACLE_BASE=/u01/app/oracle; export ORACLE_BASE
ORACLE_HOME=$ORACLE_BASE/product/11.2.0/db_1; export ORACLE_HOME
ORACLE_SID=orcl; export ORACLE_SID
PATH=$ORACLE_HOME/bin:$PATH; export PATH
LD_LIBRARY=$ORACLE_HOME/lib:/lib:/usr/lib; export LD_LIBRARY
CLASSPATH=$ORACLE_HOME/jlib:$ORACLE_HOME/rdbms/jlib; export CLASSPATH

Now we are ready to install oracle database 11gR2 on Oracle Linux 7.1
Download Oracle database 11gR2 for Linux x86-64 from Oracle, You need oracle account to download the database software.
If you have support account then you can download 11.2.0.4. I recommend to install 11gR2 11.2.0.4 on Oracle Linux 7.1.
After Download extract 11gR2 files and you will have a folder named "database"

Open terminal and browse database folder. and run following command to start the installer.
[oracle@ol7 database]$ ./runInstaller

In few moment you will see following. Enter your email address and password if you have Oracle support account. Click Next

Select Create and configure a database and Click Next

Select Desktop Class and Click Next

Set Global database name : orcl.mydomain.local
Set Administrative Password: password
Set a strong password as per oracle recommendation. I am going to use "oracle" as we are installing in test environment.

Click Next

Oracle will check minimum requirements for database 11gR2 on target system. I have face 2 warnings. You may fix these warning by installing the missing packages or ignore all as this is just a test environment. I am going to ignore these 2 missing packages as they will not effect installation. Click Ignore all and click Next

Click Install

Setup started.

Error in invoking target 'agent nmhs' of makefile '/u01/app/oracle/product/11.2.0.4/sysman/lib/ins_emagent.mk'.
Following is the work around for above error.In /u01/app/oracle/product/11.2.0/db_1/sysman/lib/ins_emagent.mk
Look for the line $(MK_EMAGENT_NMECTL)
Change it to $(MK_EMAGENT_NMECTL) -lnnz11
Click Retry and setup will continue. After database creation you will see following. Click ok

Run following scripts as root


Click OK after running scripts and you will see

Click Close, We have successfully installed Oracle Database 11gR2 11.2.0.4 on Oracle Linux 7.1
To Use Default HR schema we have to connect to sqlplus. Open terminal as Oracle user and run following command to connect to database. First we have to connect as SYSDBA to activate HR User.
[oracle@ol7 ~]$ sqlplus
Enter user-name: sys as sysdba
Enter password:
we have set the password "oracle" during setup. Enter the password and you will see.

Now unlock the HR user account and Set the password

To connect to database with HR user type
SQL> conn hr/oracle
Connected.
SQL>
Run a Simple query to check the schema
SQL> SELECT *
2 FROM employees;
You will see all the columns in Employees table.
SQL> SELECT sysdate
2 FROM DUAL;
SYSDATE
---------
26-NOV-15
In case you restarted your machine you have to start the database manually. just connect via sqlplus as sys as sysdba and run command as follows and you will see Database mounted

You can use SQL developer or Toad for Oracle instead of sqlplus to play with database. We will configure TOAD and SQL Developer in Next post.
Cheers-:)


